Erick's Wanderlust Blog has moved!!!!!
It is now The Quest for Wind and Waves: www.thequestforwindandwaves.com
Please change your bookmark/reader/whatever so you can get updates from the new site instead of this one. I have moved over from Blogspot to Wordpress and am in the process of upgrading features and appearance. I will expand the site from just a blog to contain a lot more information about my journey so far and the journey to be.
I apologize for lack of updates in the last month or so. I've had some issues to deal with in my personal life which has taken its toll on my motivation to write. Fear not though, I am back and the blog will be better than ever. Once I have finished with bringing the Facebook page and this new site up to speed, I will update my recent progress on the rebuild. I have still been working diligently on Windsong so at least the project has continued.
Please help me spread the word about this new site and continue to check for updates!
-Erick
Tuesday, February 15, 2011
Thursday, December 23, 2010
Some great videos
I've been searching around Vimeo for sailing documentaries and stumbled across a few good ones I'd like to share. These offer a great glimpse on what it is like to cross oceans on a small sailboat, all of the good and bad things.
These are segments from what will be a full length documentary about a guy near my age who buys a small boat (26 foot Contessa) and sails from Holland all the way back to his home in Australia. While my inspiration to fix up and sail a boat is a bit different than his, I can relate a lot to him.
Trailer for the full length:
This one starts off a little slow and disjointed, but eventually follows a couple crossing the Atlantic from the Canary Islands to the Caribbean.
Blue Water (part one) from Richard Gooderick on Vimeo.
Blue Water (part two) from Richard Gooderick on Vimeo.
These are segments from what will be a full length documentary about a guy near my age who buys a small boat (26 foot Contessa) and sails from Holland all the way back to his home in Australia. While my inspiration to fix up and sail a boat is a bit different than his, I can relate a lot to him.
Trailer for the full length:
Getting your Bearings / Sea Fever from nickj on Vimeo.
Lisbon to the Canary Islands from nickj on Vimeo.
Tuesday, December 21, 2010
What to do with some old equipment?
In the process of rebuilding Windsong I am uncertain if I should ditch some old equipment or try to keep it going. At this time none of these pieces of equipment are functional, and I had not bothered troubleshooting since I figured I'd try to salvage what value I could out of them by selling and upgrading. However, as the list of things I need to buy grows, I am further seeking to save a buck. Please tell me if I should keep it or ditch it.
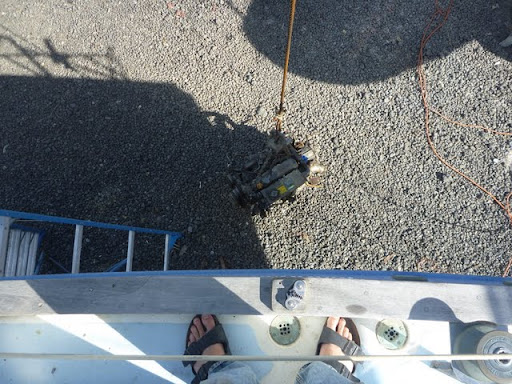
1. 1993 Seafrost SA-III (134A) Series engine driven & 120 volt refrigeration & freezer system. I would like a DC system, but have given the current one some thought. It is already set up, though I would like to give the boxes more insulation before cruising. I plan on cruising in the tropics, and I know that matters when choosing a fridge system. I am curious if this old system is worth keeping though.
I don't really like the idea of an engine driven system, I'd rather keep my batteries topped with solar and an good alternator and have a constant cycle DC system. Is that a good idea or should I seek to get this one working? Would this old system have any value to sell? Any particular units I should look at to buy? Since the system uses chill-plates, and they are already installed, would it be worth ditching the engine driven compressor and just buy a DC run unit to use with the existing set-up? If I have a DC unit, I question keeping the AC unit since if I were to be tied to shore-power I would be charging my batteries regardless.
2. 1983 Alpha 4404 Autopilot. I would like a windvane for my self-steering, but want some sort of back-up and for motoring. I figure I would get a wheel pilot, but this old beast is attached to the boat. There is a mechanical control arm, a cockpit control unit, and a compass unit. I wouldn't know where to begin to start troubleshooting this, but would be willing to give it a shot. If just one of the three parts needed replacing, would these old things be worth trying to get going?
Any opinions from my wise readers would be appreciated!
Thursday, December 9, 2010
This is a documentary (1 hour 15 min) about a group of crust punk/hippie kids who scrap together and buy a cheap sailboat, fix it up, sail to the Carribean, live off the land/ocean, and have a kick ass time. They have barely any money, but live out a dream.
This is what I'm trying to do with Windsong, though I am taking a bit more time with the rebuild. I have a lot of respect for what they did, but have a few gripes on how they went about it. I love that they sail everywhere without using the engine, catch their own food, and that they did all of this on such a budget that skill was needed to overcome easy technology. They squatted, stole materials and did some other things that I don't condone...but it's their spirit I love.
Hold Fast: Stories of maniac sailors, anarchist castaways, and the voyage of the S/V Pestilence...
Hold Fast from Moxie Marlinspike on Vimeo.
Friday, December 3, 2010
Out comes the Engine!!
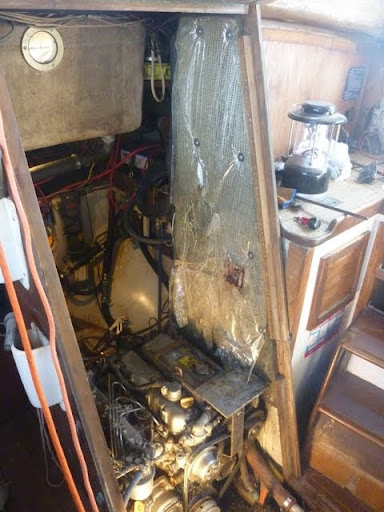
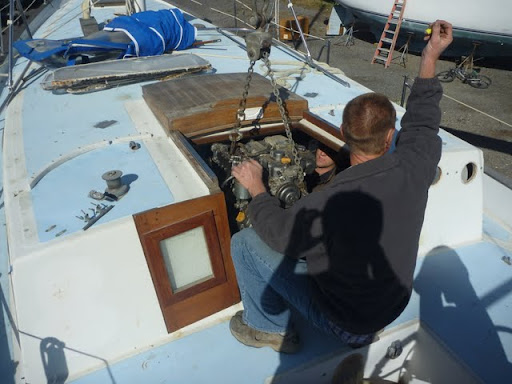
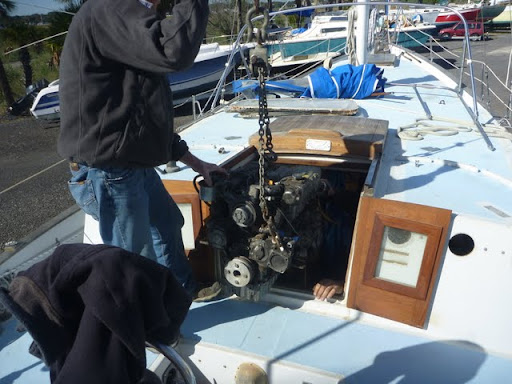
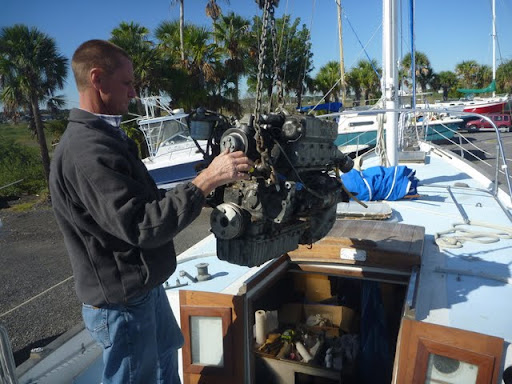
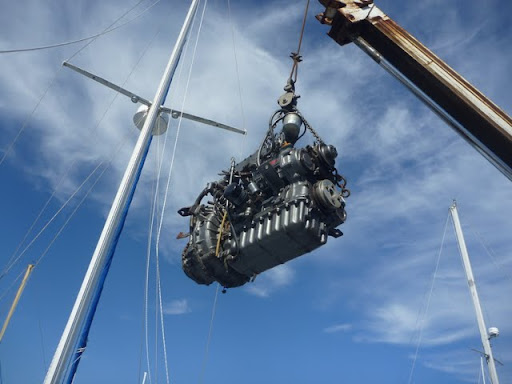
In the last post I had gotten the shaft coupling separated from the transmission. Since then I had disconnected everything from the engine and had it pulled out yesterday. It was pretty exhilarating to get it out and begin the engine room project.


The following was done to prepare for the engine pull:
-Remove refrigerator compressor and its mount
-Disconnect all hoses - water feed, fuel feed, fuel return, exhaust
-Disconnect wiring harnesses, starter battery wire, grounding wires
-Remove alternator (want to replace it, and it gave some extra room to get to wiring and mounts)
-Disconnect coolant water expansion tank and hose
-Remove belt
-Remove air silencer/intake (needs to be replaced, flimsy and always falls off anyways)
-Separate shaft coupings
-Remove engine room side insulation (for a little more room to work with)
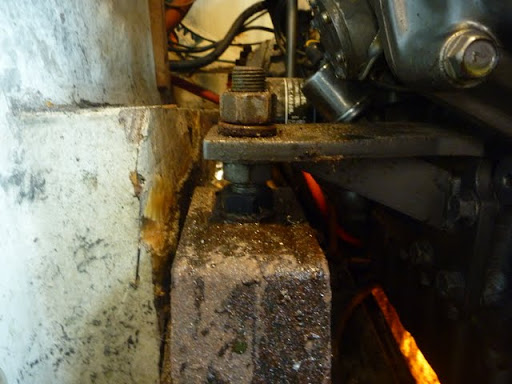
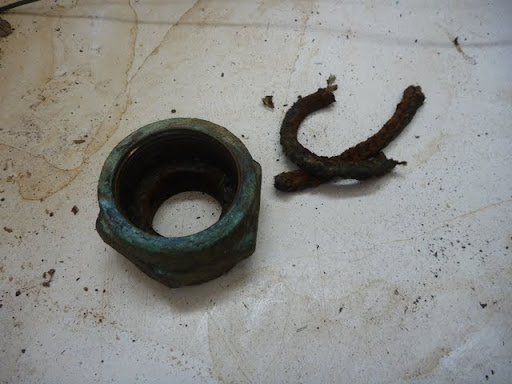
-Remove motor mount nuts. The rear motor mount nuts were so rusted and frozen, I needed to use a combo of drilling through them and a dremel cutoff wheel to get them off. They were easily the biggest pain of this whole process.
-Disconnect the transmission control wire
-Disconnect throttle control wire
-Disconnect tachometer wire
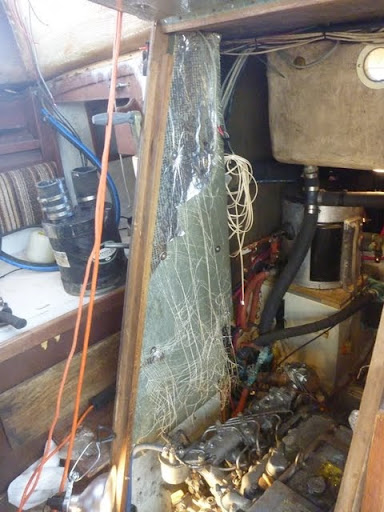
Picture time!
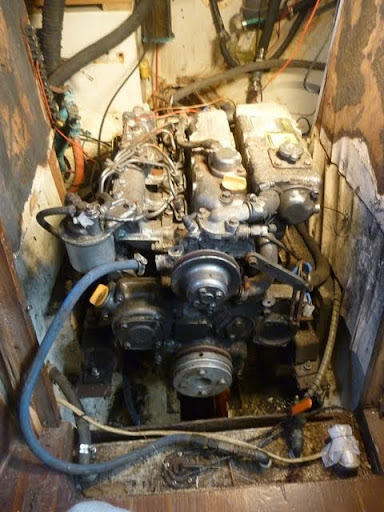
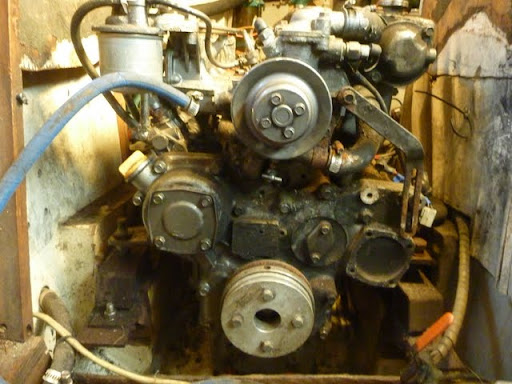
Engine and Engine room before anything was removed:
Removing the coolant water expansion tank hose:
Side panel insulation before removal. In poor shape
Front stbd mount. This one was easy
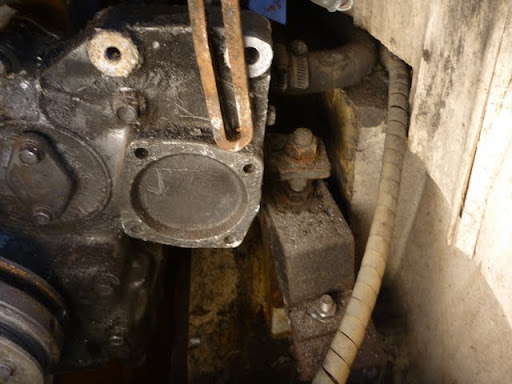
Front port mount. Needed to remove the fuel tank hoses to get to it. Post alternator removal as well.
Mostly disassembled
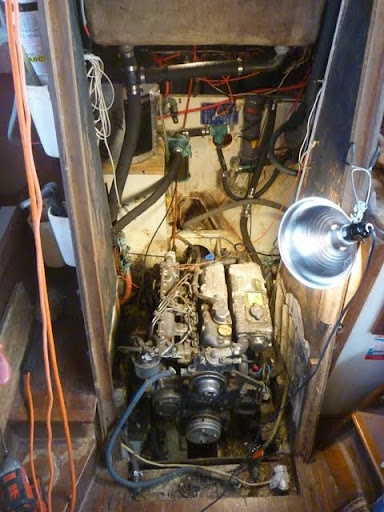
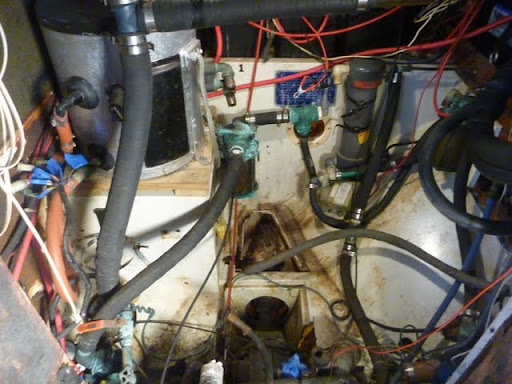
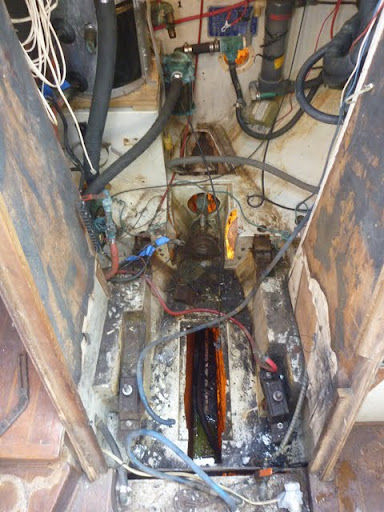
Engine room
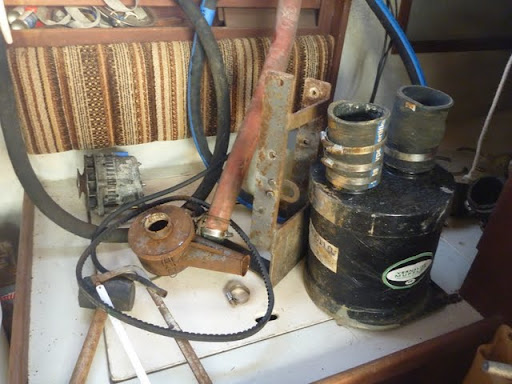
Things that have come off
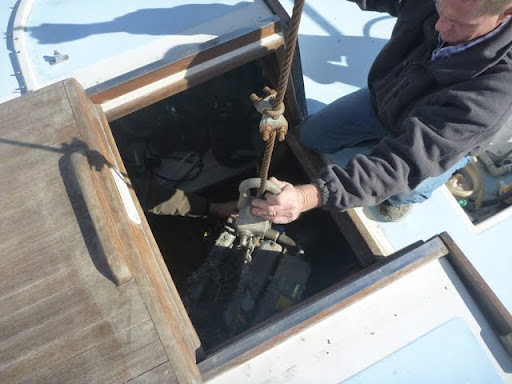
View from above after removing companionway stairs
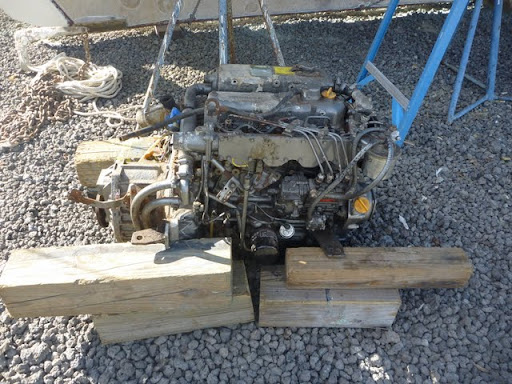
Up comes the engine!
Will it fit!?
Piece of cake
Beautiful!
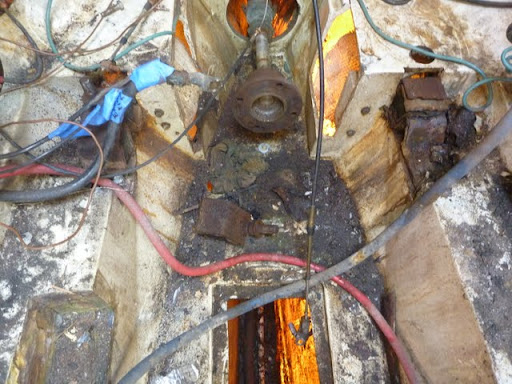
Engine room post removal. Cleaning this place up is one of the big reasons I wanted it out of there.
Notice the piece of motor mount lying there. The aft, port mount rusted in half!
The Abyss (aka, the bilge). Cant wait to clean that out
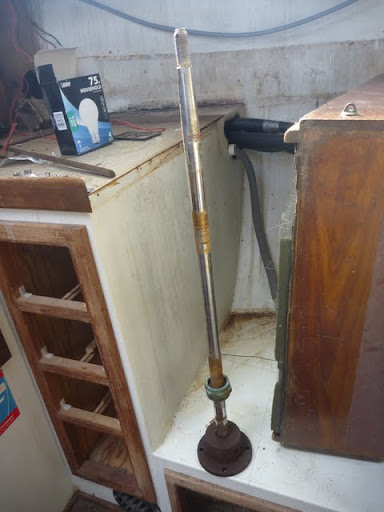
The shaft
Packing nut with loose flax packing. This is what allowed water to spray all over the engine room. Can't blame it for failing after seeing the poor condition of the mounts.
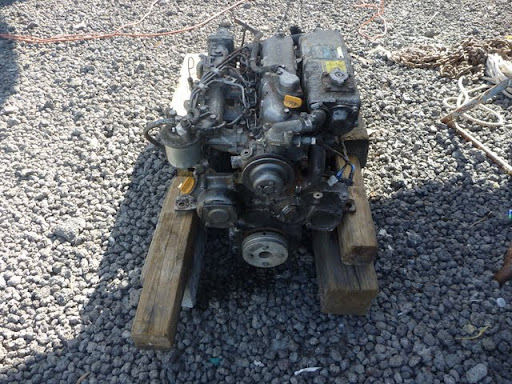
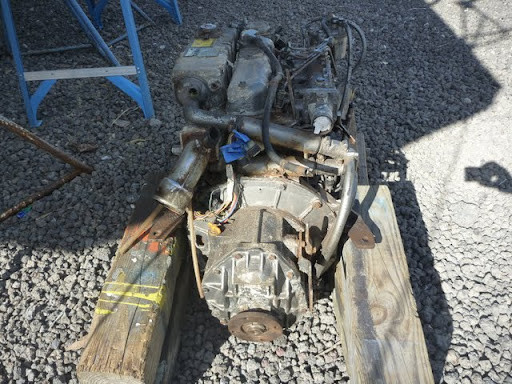
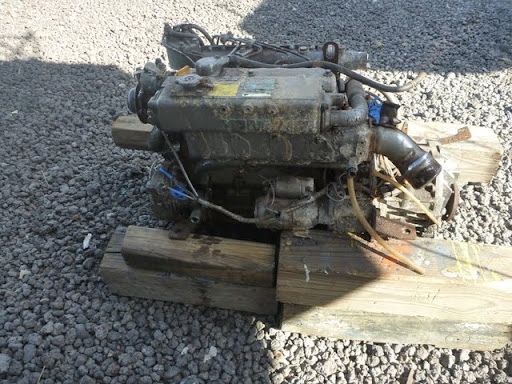
Engine all cosy on the ground, ready for work.
Cant wait to clean and paint the beast.
Now the work begins!
Wednesday, November 17, 2010
On to the Engine Room
Momentum is a funny thing. When doing a major boat refit/rebuild like this, momentum counts for a whole lot. More often than not, each project reveals 10 more problems than you expected. Each time these problems come up, momentum takes a hit and motivation goes down hard. Recently I've found myself half finished with many of my projects by hitting roadblocks, and a little lost on where to spend my time on the boat. Whenever I find myself lost, I revert to taking things apart inside the cabin. It is relatively easy work, and I feel like I am getting things done. However, these are mostly cosmetic issues that won't get the boat back in the water anytime soon.


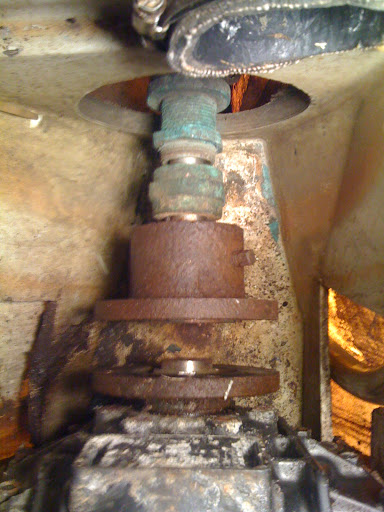


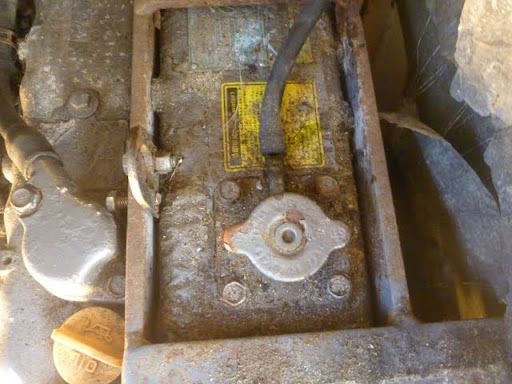
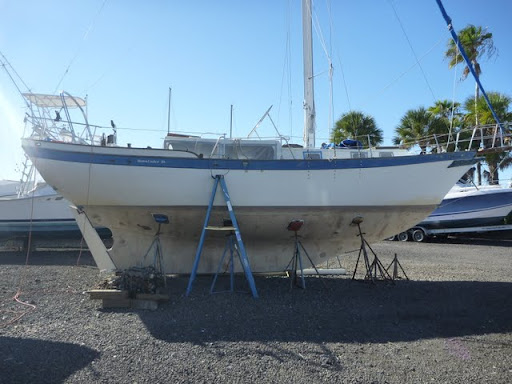
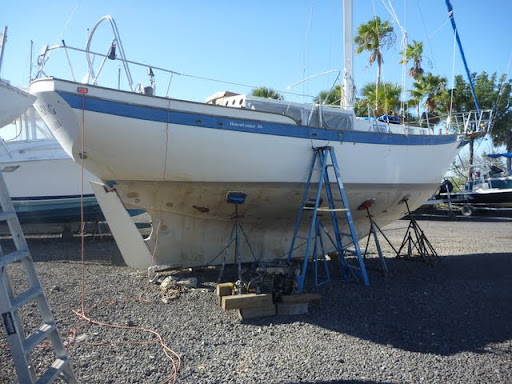
So with the weather cooling down, I decided it is time to focus my efforts on the monolith that is the Yanmar 4JH2E - my diesel engine. Not just the engine, but the entire engine room needs work before we splash. The primary issue in there is the need to replace the stuffing box. I could probably refurbish it, but will most likely go with a PSS shaft seal as a replacement. If you go back to the posts when I hauled out, you would see the broken propeller shim that caused a lot of vibration of the shaft and engine. This caused the shaft seal to leak, which in turn sprayed water all over the engine room. Unfortunately, to replace the stuffing box the shaft must be removed. In order to do so, one of 3 things needs to happen: remove the rudder, remove the transmission, or remove the engine all-together.
My plan for the engine is to completely clean it off of old paint and rust, replace all hoses and clamps, replace the rusted and busted air intake, and do some general maintenance on the engine. I might go as far to replace the seals/gaskets, refurbish the heat exchanger, have the injectors inspected, and who knows what else. With all of that in mind, I decided it would be easier to just pull the engine so I can have easy access to all of the engine itself, and the entire engine room for cleaning (room and bilge), rearranging, and painting.
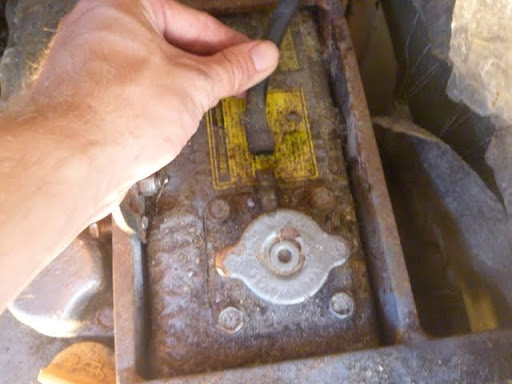
So with the idea that the engine is coming out of the boat, I began to have some mental momentum of things that need to get done. First step is to prepare the engine for removal by disconnecting all hoses, wiring and the shaft from the engine. I started by attempting to separate the shaft coupling from the transmission and then the shaft from the coupling. This job is notoriously difficult, and with my coupling being a ball of rust...it was a tough task.
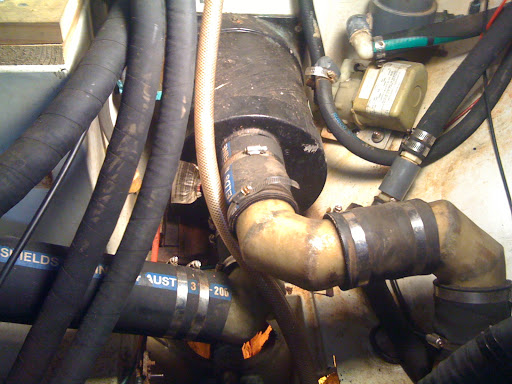
Here is the coupling, stuffing box and shaft before any disassembly. Note all of the rust, especially at the set screws.
I started by applying penetrating oil to the coupling bolts, set screws and the shaft itself every day for about a week. I then needed to start removing the exhaust hose and muffler to gain access for wrenches to fit down there.
Here is the exhaust and muffler above the shaft:
With some brute force, the coupling bolts came off eventually. The set screws took a lot more effort, blood, and sweat to get out. One of them was easier than the other, both took vice grips to get them to budge. Here is the coupling after separation, and vice grips on the set screws.
Below the muffler was a plywood panel that capped the space where the stern tube is located. This wood was pretty much disintegrated thanks to the stuffing box leak. I'm pretty sure the exhaust leaked down there as well.
I then set out to remove the coupling from the shaft. The recommended trick is to set a spacer (I used a socket) set between the couplings against the shaft, and then crank down on bolts connecting the coupling halves. Cranking down on the bolts evenly would then push the shaft out. Unfortunately, I found that I have very little clearance between the transmission and transmission coupling to allow any bolts to be screwed down. I might be able to get it done by cutting some bolts to a precise size. I then realized that it was silly for me to be trying this hanging upside down in the engine room when I plan on pulling the engine out anyways. I'll attempt to remove the shaft coupling once the engine is out and I can do it in a more comfortable setting.
So with the couplings separated, I then turned my attention to wiring, hoses and the motor mounts. The front motor mounts are fine and I was able to crack loose the bolts, but the back mounts are horribly rusted. One of them is cracked, probably adding to the vibration I experienced when motoring. It now looks like I will have to cut the nut off the mount, and then replace the back mounts once the motor is out. Like I said...once you start a project, 10 more show up.
I plan on getting the engine fully prepped for removal this week. I go out of town next week for Thanksgiving, then when I get back its time for the pull. I am pretty excited about the pull and to begin the engine refurbish. Momentum is growing, and my enthusiasm with it.
Friday, October 22, 2010
Removing old Thru-Hulls and Seacocks
One of the things I knew about Windsong when I first saw her was that all of the seacocks needed to be replaced ASAP. They are very old-school style Groco seacocks and all have corroded to the point where they are inoperable. What does that mean? If a hose were to leak, I would not have had a way to shut off the thru-hull and the boat would probably sink unless the hose or seacock was plugged.


Seacocks are meant to be the #1 insurance on the boat against sinking, and I didn't have that insurance for the entire time I owned the boat in the water. Since I started the bottom job I have been contemplating how the heck to get the seacocks and thru-hulls off the boat. They were so corroded that unscrewing the thru-hull from the seacock was impossible. I spent many months contemplating my approach and did as much research I could on the subject. Unfortunately there aren't many articles written on how to get this job done on old, corroded equipment. There are plenty of articles on how to take apart modern seacocks, but non on how to tear apart old ones with no hope of reuse.
I did, however, find a few blogs and forum posts from people who just cut the thru-hulls up with a Dremel or some other tool to help remove them. But with my limited experience in doing things like this, I really needed a step by step instruction on how the heck to do that. After some creative thinking and experimentation, I finally figured out how to do it and here I will show my process.
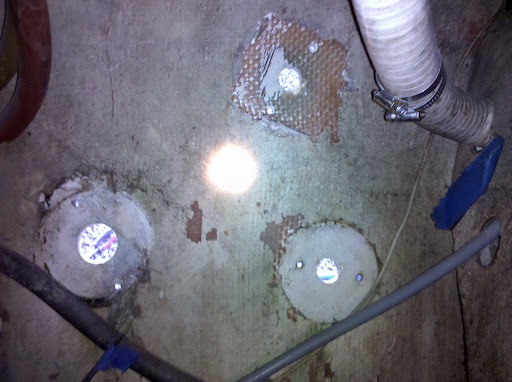
Here are the seacocks in the head with hoses removed. One is the sink drain, another is for the head itself, the other was unused with no plumbing coming from it.
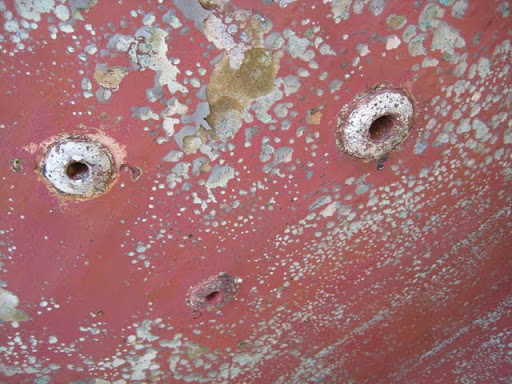
Here are the thru-hulls attached to these seacocks
Each seacock has two bolts that go through the hull that needed to be removed. My dad and I began this job back in May by removing the hoses to the seacocks and the bolts that go through the hull. Once we reached that point, we were stumped as to how to remove the thru-hull from the seacock. So after my research I took a stab at cutting the thru-hulls to remove the mushroom head so I could just pull the seacocks out from the inside.
I removed the three thru-hulls from the head seacocks before I got down there with the camera, so the sequence below shows the thru-hull from the galley sink. As you can see, the two bolts are still attached so I wasn't able to actually remove that seacock until I get a second hand, but the process is still shown.
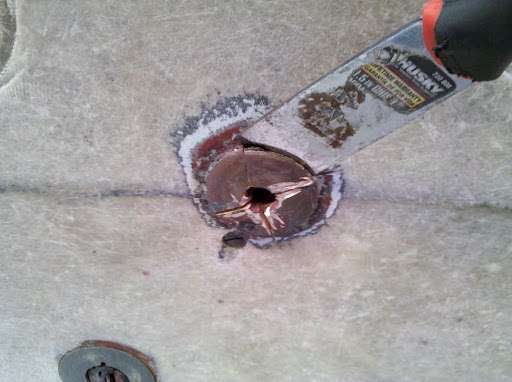
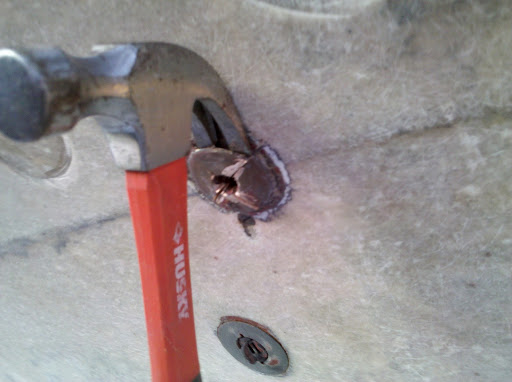
First, using a cut-off wheel on my Dremel tool, I made a series of cuts to create some pie wedges. For the bigger thru-hull in the head, I needed to make a few more slices.
In my research I learned that bronze is a pretty soft metal, so cutting and bending is quite easy. In this next step, I hammered a scraper/chisel under one of the slices and pulled down to bend the slice outwards a little bit, enough to fit the back of a hammer under the slice.
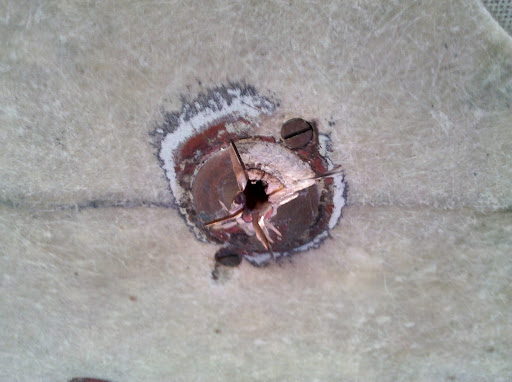
With the hammer under it, pry the piece right off. The pieces pried off surprisingly easy.
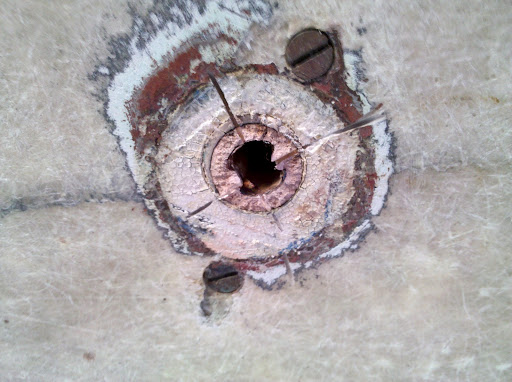
Repeat the process for each slice until all you have left is a the clean shaft of the thru-hull in the hole.
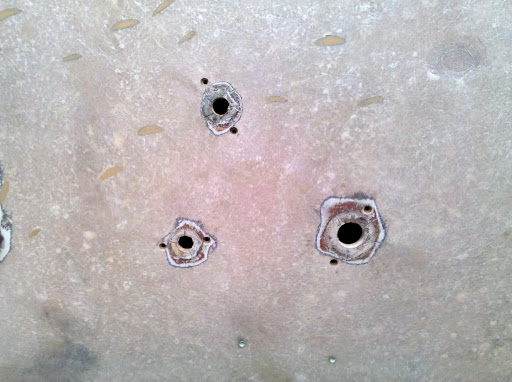
At this point I went inside and removed the seacock by just pulling it out. One seacock just fell off after cutting the mushroom, one needed to be pried off with the back of the hammer, and the other just needed some muscle to pull out. Here is the head area with all removed:
Outside:
Inside (thats a flashlight in the middle):
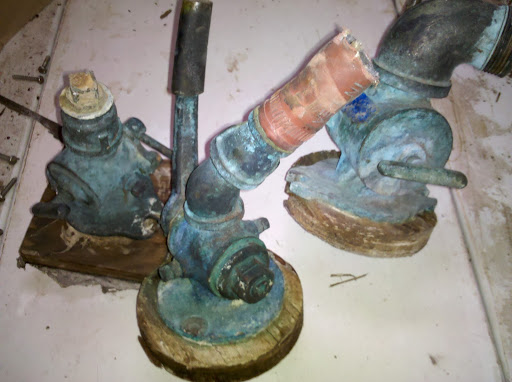
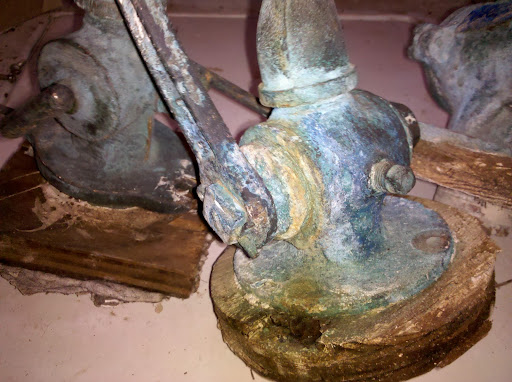
Old seacocks. You can see how corroded they are, no hope for the valves to turn. They are not the newer style Groco seacock with a locking nut on the base.
After figuring out this process, removing these things is a piece of cake. I'll need some help to get the remaining seacocks unbolted, but I am no longer worrying about the process when comes time to start fairing and repairing the bottom.
I'll be using these articles as reference to install new thru-hulls and seacocks (links):
Subscribe to:
Posts (Atom)